
OverviewNAME: Burangiri AbilitiesRSL_AllBattles_ResistAura Obtain fromAncient Shard Blessings RecommendationCommanding Presence (Aura Lead) |
Grinding★★★✰✰ Campaign Dungeons★★★★✰ Minotaur Potion★★★✰✰ Arcane Keep Doom Tower★★★✰✰ Floors |
Burangiri Skills
Battering Skull
Attacks 1 enemy. Has a 20% chance of placing a [Provoke] debuff for 1 turn.
Level 2: Damage +5%
Level 3: Buff/Debuff Chance +5%
Level 4: Damage +5%
Level 5: Buff/Debuff Chance +5%
Level 6: Damage +10%
Level 7: Buff/Debuff Chance +10%
Damage Multiplier: 3.1 DEF
Bakemono Charge (Cooldown: 4 turns)
Attacks all enemies. Has a 40% chance of placing a [Stun] debuff for 1 turn.
Level 2: Damage +5%
Level 3: Damage +5%
Level 4: Buff/Debuff Chance +10%
Level 5: Buff/Debuff Chance +10%
Level 6: Cooldown -1
Damage Multiplier: 3.5 DEF
Frightful Warcry (Cooldown: 6 turns)
Places a 25% [Strengthen] buff on all allies for 2 turns. Also places a [Shield] buff for 2 turns on all allies with less than 50% HP. The [Shield] buff is equal to 15% of the target’s MAX HP.
Level 2: Cooldown -1
Level 3: Cooldown -1
Soulmonger (Passive)
Heals this Champion by 50% of their MAX HP whenever an ally or an enemy dies.
Aura
Increase Ally RESIST in all Battles by 40.
Burangiri Build Guide
| Arena, Campaign, Clan Boss, Dungeons, Doom Tower, Faction Wars | |
Recommended ArtifactsPvE: Bloodthirst, Impulse, Lifesteal, Reflex, Relentless |
Stats AllocationWeapon (ATK) |
Stats PriorityBuffer & Debuffer: ACC, RES, SPD, HP%, DEF% |
|
Burangiri Mastery Guide
Arena, Campaign, Clan Boss, Dungeons, Doom Tower, Faction Wars

Offense
|
Defense
|
Burangiri References
This section covers Burangiri’s build specialised for specific areas in Raid Shadow Legends.
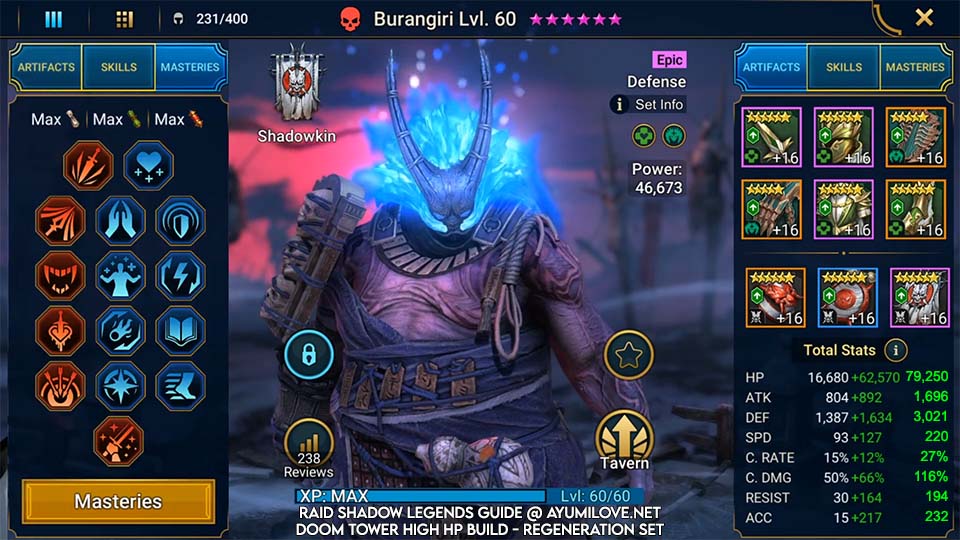
Burangiri Doom Tower Dreadhorn HP Build
Here is Burangiri’s artifacts and masteries by Chofly optimized to solo Bommal the Dreadhorn in Doom Tower. This Burangiri solo strategy was shared by u/Aegisthus90 on Reddit to help the community on countering Bommal the Dreadhorn on a budget, where he tested this on Doom Tower Normal Difficulty. The RAID content creators caught on about this and shared this strategy on their Youtube channels. Burangiri is equipped in Regeneration Set and Immortal Set to replenish his Health significantly. The stats to prioritize on Burangiri are Health, Speed and Defense! Although the Dreadbomb deals damage based on the champion’s MAX HP, a high amount of health is still required, so he can tank the damage dealt by Dreadhorn Boss. In addition, speed is crucial to enable Burangiri to take 2 turns of the enemies 1 turn, to quickly replenish his health via Regeneration Set and Immortal Set! It’s recommended to achieve at least 60~70K Health, 3~4K Defense and 220~250 Speed for Doom Tower Hard, and these stats can be lowered for Doom Tower Normal.
Burangiri Review
Burangiri is an Epic Defense Force affinity champion from Shadowkin faction in Raid Shadow Legends. Burangiri was introduced in Patch 4.20 on May 2021 as the second batch of Shadowkin champions!
Burangiri is a tank/protector champion who crowd control enemy using Battering Skull (A1 Skill) to provoke enemy and Bakemono Charge (A2 Skill) to stun multiple enemies in battle! Burangiri also support allies with his Frightful Warcry (A3 Skill), which applies to Strengthen Buff and Shield buff to your team. This increases their survivability in a precarious battle such as boss raids. Burangiri has a unique passive skill Soulmonger that heals him whenever an enemy or an ally is killed. This enables Burangiri to solo Bommal the Dreadhorn as he is able to heal himself significantly when the Dreadbombs explodes, making him one of the best candidate to clear this roadblock in Doom Tower floors. In addition, Burangiri has a useful Resist Aura in all battles to aid you in building a high resist team for all content.
Burangiri Champion Lore
Burangiri, infamous throughout Yakai as the Soulmonger, was once known as the Boar King and Master of the Rampage. Born among the Fae of the Mistwood, he quickly acquired a position at the Fae Court that involved protecting the Sylvan realm from interlopers and corruption. Like many Fae, he is capable of shifting his form, and in his early years often assumed the guise of a huge, tusked boar.
While Fae are sometimes imagined as effete, mercurial creatures, Burangiri’s attitude was always more brutish and simple. He delighted in breaking and sundering things with his thick skull or horns, and other Fae came to view him as nature’s wilder and most untamable elements given form, a roving beast-spirit of the forest. Like a cyclone or a summer storm, Burangiri would shatter old, ailing trees to clear the way for new life, or plough up and mulch the woodland floor. The Fae Court put him to work driving out unclean spirits and interlopers, setting the Boar King loose on those not welcome within the Mistwood’s borders. In this way he aided the Sylvan Watchers and did his part to preserve the Mistwood and its Rhythm.
Things changed when a Dark Elf sorcerer named Lameth made the Mistwood his new home. Lameth had been exiled from Durham, and sought a new deep wood to make as his lair. Burangiri’s stampeding soon put a stop to the Dark Elf’s schemes. He trampled Lameth, but as he did so, Burangiri did more than merely destroy Lameth’s body. As the Dark Elf’s life essence left his broken body, Burangiri’s mane of blue flames snared it, and he found himself able to devour the incorporeal spirit before it dissipated. Such a meal filled him for a while with an unstoppable energy, adding to his already bountiful strength and vigor, and he found the taste of soul essence exquisite.
Burangiri repeated his consuming act with another invader of the forest, and another. He grew addicted to the devouring, his body becoming lit by spectral blue soul flames, his need to feast growing ever-greater. He found himself relishing the power derived from consuming souls far more than he would any regular meal, eventually using it as his only source of sustenance. The more dark beings he gorged on, the more his own mind and form became twisted.
Other Fae were not ignorant of the changes Burangiri was undergoing. As his rampages became more fraught and unpredictable, he was summoned before the Fae Court. They banished him from the Mistwood, saying he could not return until he had learned to tame his hunger, a decree that initially enraged him. Try as he might though, he could not break the arcane wards put upon him that kept him outside of the Mistwood’s borders.
Frustrated, the hulking Fae set out into Yakai, determined to overcome his need to feast on a diet of foul souls. His struggle continues, and at times he succumbs. His legend has become renowned throughout Yakai, where he takes on a hulking form bearing a skull-mask framed by the blazing soul fires of those he has consumed.
One wise woman of Yakai’s high hills has prophesied that only through good deeds can Burangiri drain the evil he has consumed and find the abstinence he craves. Whether this is true or not remains to be seen, but there are many dark spirits within Yakai, a legacy of the brutal reign of the Mikage, and Burangiri pursues them with the same relentlessness that he once showed driving corruption from the Mistwood.
Burangiri Updates
- (2024-01-04) Raid Shadow Legends Patch Notes V8.10
- (2021-05-07) Raid Shadow Legends Patch Notes V4.20
Burangiri Videos
Raid Shadow Legends Burangiri vs Dreadhorn Guide by ASH

Raid Shadow Legends Burangiri vs Dreadhorn Guide by Chofly

Raid Shadow Legends Burangiri vs Dreadhorn Guide by MtgJedi

Raid Shadow Legends Burangiri Champion Guide by Tiago Titan

Totally agree with Campa. Burangiri should have a higher rank for Scarab King. There was no issue running him on Scarab King instead of Bommal.
I got sick of having to manually run Scarab King and slightly modified my Burangiri-Bommal solo team to handle him instead.
Last rotation i progressed and my Burangiri “soloed” Floor 100 Scarab King (Spirit).
It took forever but i could just let the fight run. No risk of death at any point i could see.
Over 1000 turns over 1 hour.
So not exactly farmable in a practical way but could problaby easily modify it with Sun Wukong in Destroy Max HP gear or something to speed it up (But i’m a F2P acc and dont want to switch out his Arena gear)
My Burangiri’s stats:
46k HP, 4500 def, 174 spd, 103 res
Regen + Immortal, Def% gloves, Def% chest & Speed on boots
Another comment on Burangiri.
I was finally able to beat the Scarab King on Floor 90, force affinity.
I have a mid- to late-game account, 300+ days in. Despite this, I was only able to beat the force affinity scarab king using the Burangiri and Sun WuKong strat, that I used to defeat Bommal, described below.
Burangiri is hard to rate; his kit is less than exceptional on most content, but it becomes absolutely essential to beat certain doom tower bosses. He’s basically the key to beat Bommal, on many accounts, and on my account, he was the only way I found to beat Scarab King.
Because he is a cheat code to beat some of the most difficult bosses in the game, I would change his rating to A, and I would change his scarab king rating to 4 stars, at least, and possibly 5.
Just my 2 cents, thanks, Ayumi!
After dozens, maybe hundreds, of attempts, I was finally able to beat Bommal on Doom Tower Normal floor 90, exclusively thanks to Burangiri.
I did it with a Level 50, not six starred, Burangiri, because I really didn’t want to waste resources six starring him if I could avoid it since I’m F2P. I don’t like his kit that much, although it’s game changing for Bommal.
For those struggling on that stage, my specs were as follows:
Burangiri, Lvl 50, ascended
Immortal Weapon and Boots, Regeneration on other artifacts
HP% on gloves, chest and boots, HP ring, Atk necklace (HP or Def would have been preferred on neck but unavailable)
One epic tome used, level three masteries only
Key stats: 54.8k HP, 2100 Def, 126 Spd, 181 Res
The Res was really key for me, I was trying to beat him with tankier artifacts but couldn’t do it, but the slightly less tanky artifacts with higher resistance did the trick.
Three key members to the Team:
1. Rector Drath (used for Resistance aura, to help Burangiri resist bombs. I tried with Jareg HP and Michinaki Def auras, but I couldn’t beat Bommal with these auras)
2. Sun Wu Kong (damage dealer – as long as Burangiri stays alive, he can revive and deliver damage)
3. Burangiri
All members of the team except Burangiri and Sun Wukong died pretty quickly, but Drath was essential for her aura.
Total time taken 11:14 (full auto). Although I didn’t do this, I would also set up the team so Burangiri only uses his A1, since the self buff he casts on his A3 increases the chance of Bommal placing a second bomb which can be problematic.
Glad this boss is finally done! Good luck e1, and thanks Ayumilove!
He is so great in defence. Healing himself whenever an ally or enemy dies granting revival of Sun Wukong many many times.
Fix his rating for Ice Golem, please. Does he have 2 * or 4 *?
Very hard to get this champ to solo Bommal. There are other options now.
With masteries, I would disagree with Warmaster. Outside of Bommal he is a control champ and has two late-game spots – Faction Wars and the Force DEF secret room. Fearsome Presence would enhance his A1 and A2, neither of which are 100%.
Once I got him to 6-32 he started soloing through Dreadhorn. I still have to max his gear, most of it is at level 12 but he owns Bommel. No books, no masteries, I am keeping him in the Sparring Pit now to level him up.
The only person I’ve been able to pull off a solo hit on this guy is with Samar. He’s in the same build as they have him in and his speed I think they said had to be close to the low 250s, 258 is what mine is, and he can so low it no problem it just takes a while
Try with a deflection set (4 parts) and speed set all def% where you can. Once you unlock the passive he is a spider god. Not only with him in lead do you get a huge res boost but his two turn strength boost plus ever time a baby spider dies he gets a 10k heal. Right now With Kael I watch him heal for around 100k every aoe.
Vino
your speed is too low. shoot for 200
you have to get 2 turns for every 1 of his
HP is good. Bump up Def a bit if possible
My current one still cannot pass lv90 Normal, a 10/10 failure rating with stat that is way too low to survive: 78868 hp 2088 def 138 spd 78 res and 108 acc . He dies about taking off 40% of the boss HP pretty much solo since turn 2. If you are successful at normal 90 solo please share you stat. I know I have a long way to go. If I get him to beat lv 90 I will definitely do a follow up here.
So, I have 2 of these guys. Training them both up to dual duel Dreadhorn! if one can take him out then two should bring him back to their place for coffee.
Specifically his a3. Meant to clarify that in my first post
He has some solid skills but are in dire need of -1 cool down. With the current booked skills, the cooldowns on skills are too long.
Burangiri guide in portuguese language by Tiago Titan https://youtu.be/8dVYY6Hl8xI
I pulled him recently. I really wish he was better because his graphics are so cool, but the cooldown ratios suck. Even booked it’s just 3:1 and 4:2. A reflex set would make him viable, but still not great.
I’ll be holding onto him and hoping he gets a nice fix in a future update.
@Ayumilove please update! Thanks so much for all your hard work!
He looks like a strong doom tower and faction wars champ with his strengthen and stun attacks, I hope more is added soon, im keen to build mine
I just got him. Looks so cool, but nothing about him here yet.
i’m thinking something like swift parry or regen for this guy to ensure he is the last to die or stun and fearsome presence mastery to to amp up his crowd control.