Today I will be performing a thorough review on a desktop chassis from Fractal Design more specifically the Define Series XL R2. Fractal Design offers 2 models of this case which is the Black Pearl and Titanium Grey. The overall structure chassis for both models are the same except for the front door panel that has a different appearance. Black Pearl exhibits a piano gloss appearance whereas the Titanium Grey displays a refine brush-aluminium appearance.

What makes this model stands out from the crowd of Fractal Design chassis series (Node, Arc, Core) is its built for silence. The Define Series focuses on reducing noise emitted from vibrating components such as fans and coil whines. If your current rig is placed closed to you while you are working at your desktop or used to have your machine running in your bedroom while sleeping, this is the perfect solution to solve those irritating noise issues. More details about that but first lets take a brief look over the chassis specifications below.
Fractal Design Define XL R2 Specifications
| Model | ||
| Brand | Fractal Design | |
| Series | Define | |
| Model ID | XL R2 | |
| Case Specifications | ||
| Dimension (W x H x D) | 232 x 559 x 560 mm (chassis), 322 x 637 x 655mm (packaging) | |
| Weight | 16.42 kg (net), 19 kg (package) | |
| Form Factor | Full Tower | |
| Material(s) | Stunning Titanium Front Panel design, Steel Chassis | |
| Motherboard Support | mITX, mATX, ATX, E-ATX, XL-ATX | |
| Front I/O | 2 USB-3.0, 2 USB-2.0, 1 Audio Jack, 1 Microphone Jack | |
| Side Window | Optional. Windowless has grilled fan holes (120/140mm) | |
| Expansion and Drive Bays | ||
| Expansion slots | 9 | |
| Power Supply Slots | 1 | |
| External 5.25″ | 4 | |
| Internal 3.5″ | 8 (Compatible for SSD and HDD) | |
Fractal Design Define XL R2 Packaging and Unboxing
Foam and Plastic
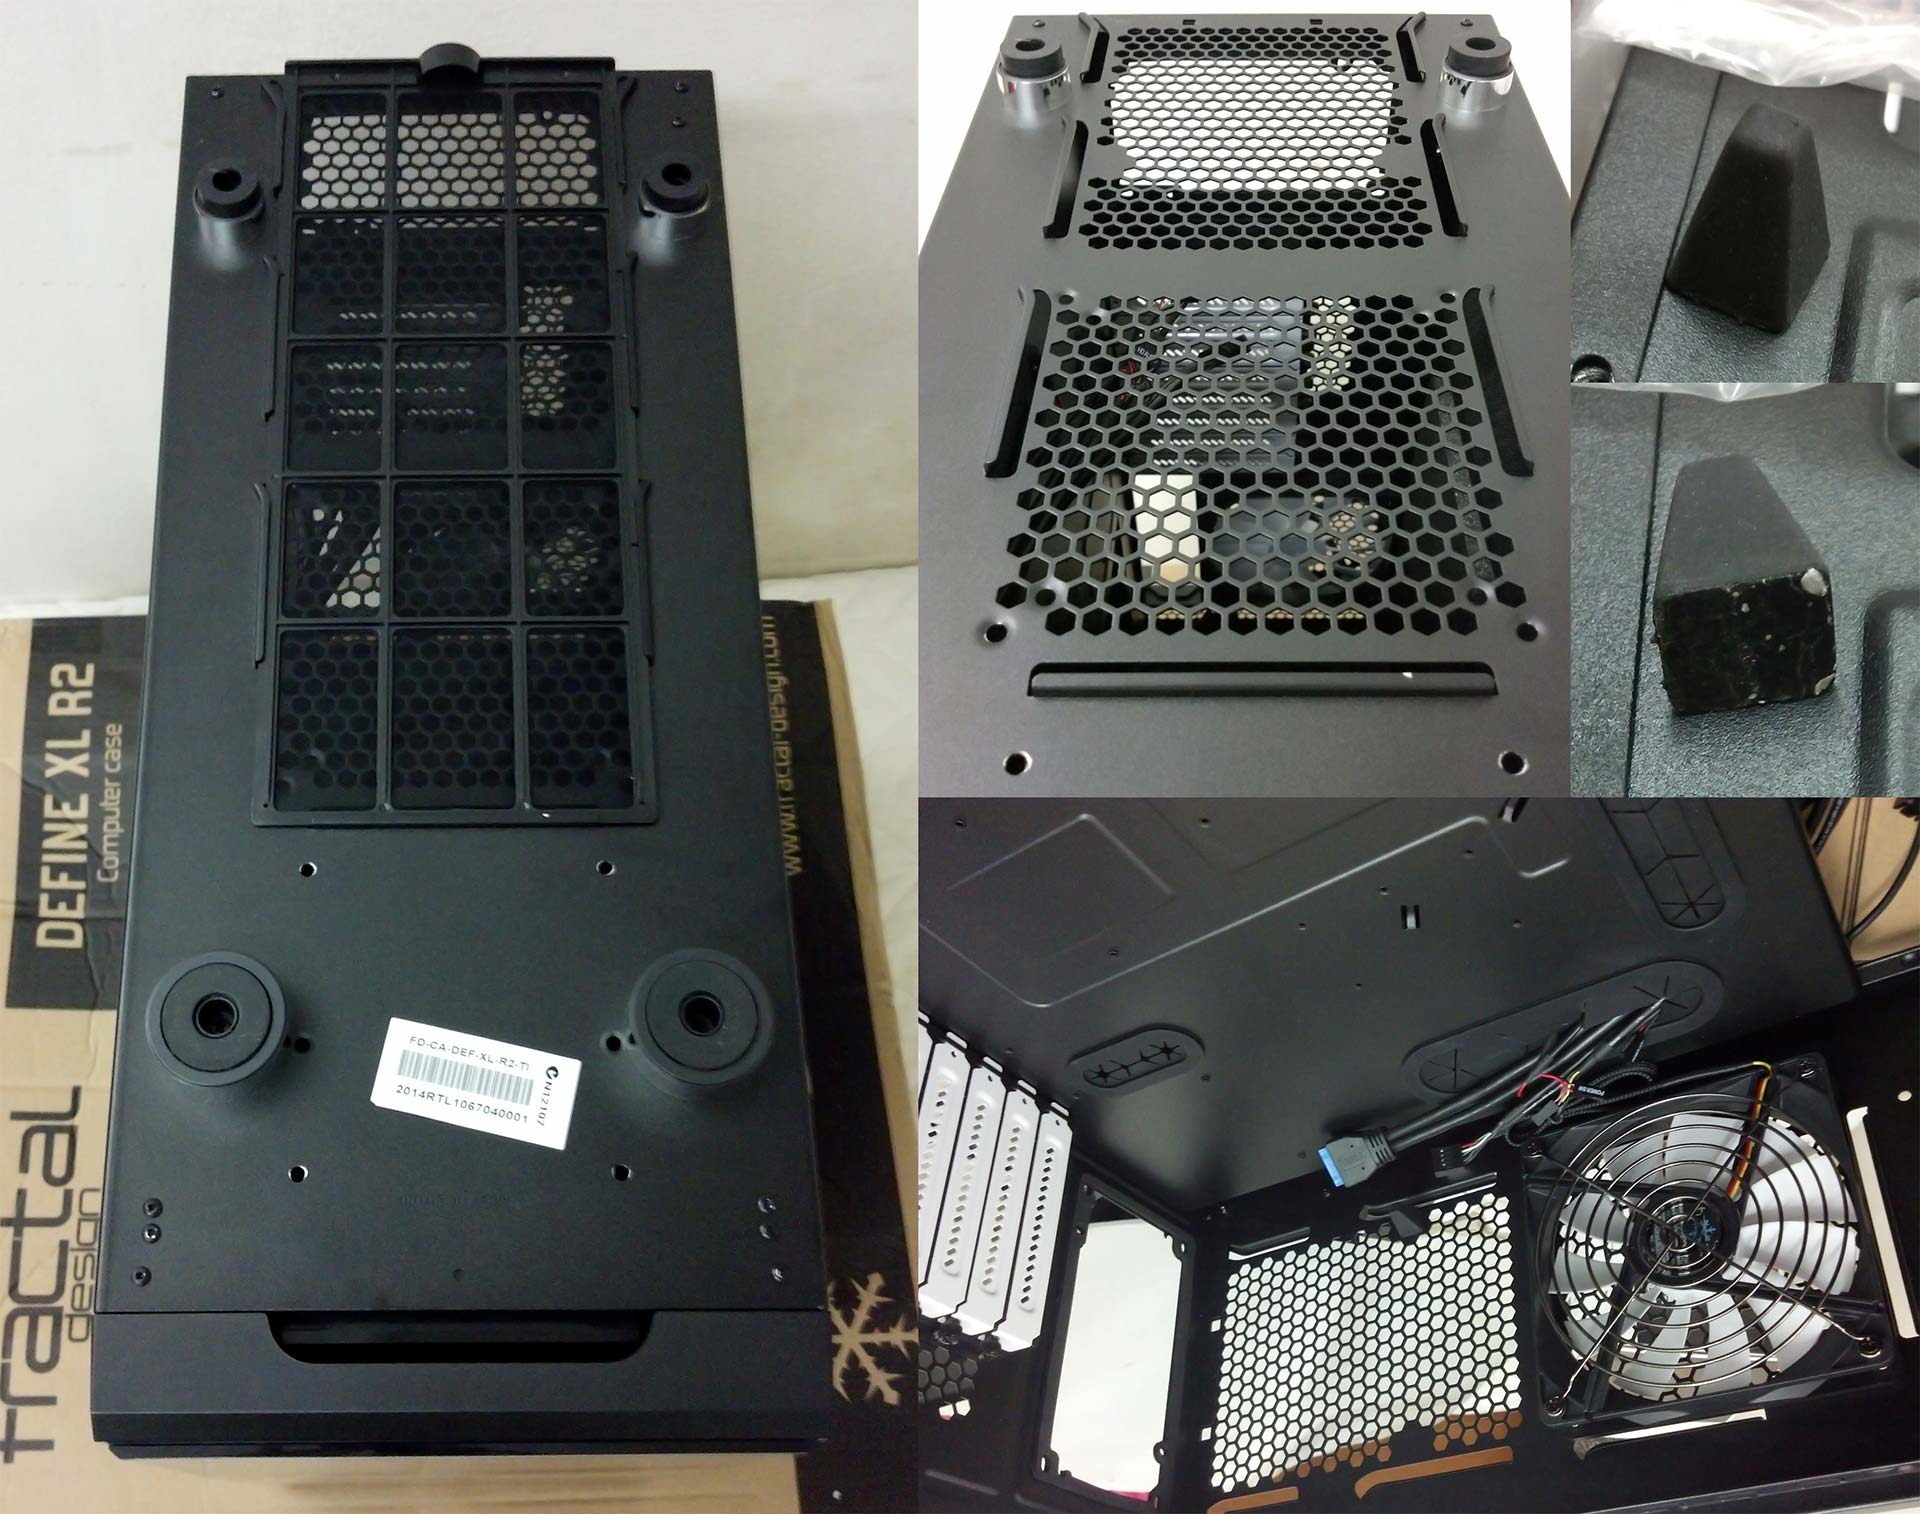
The foam used to package the heavy chassis is hard foam type. Opening the package reveals some cracks at the corner of the foam broken half way through. A softer foam packaging would be ideal to absorb impact and shock with less chances of tearing itself apart. The chassis is also protected with a thick plastic to prevent it from any scratches during the shipment of chassis. Since the packaging weighs almost 20kg, it would be better to lift it with 2 person or use a trolley to transport it.

Fractal Design Define XL R2 Exterior
Top Panel
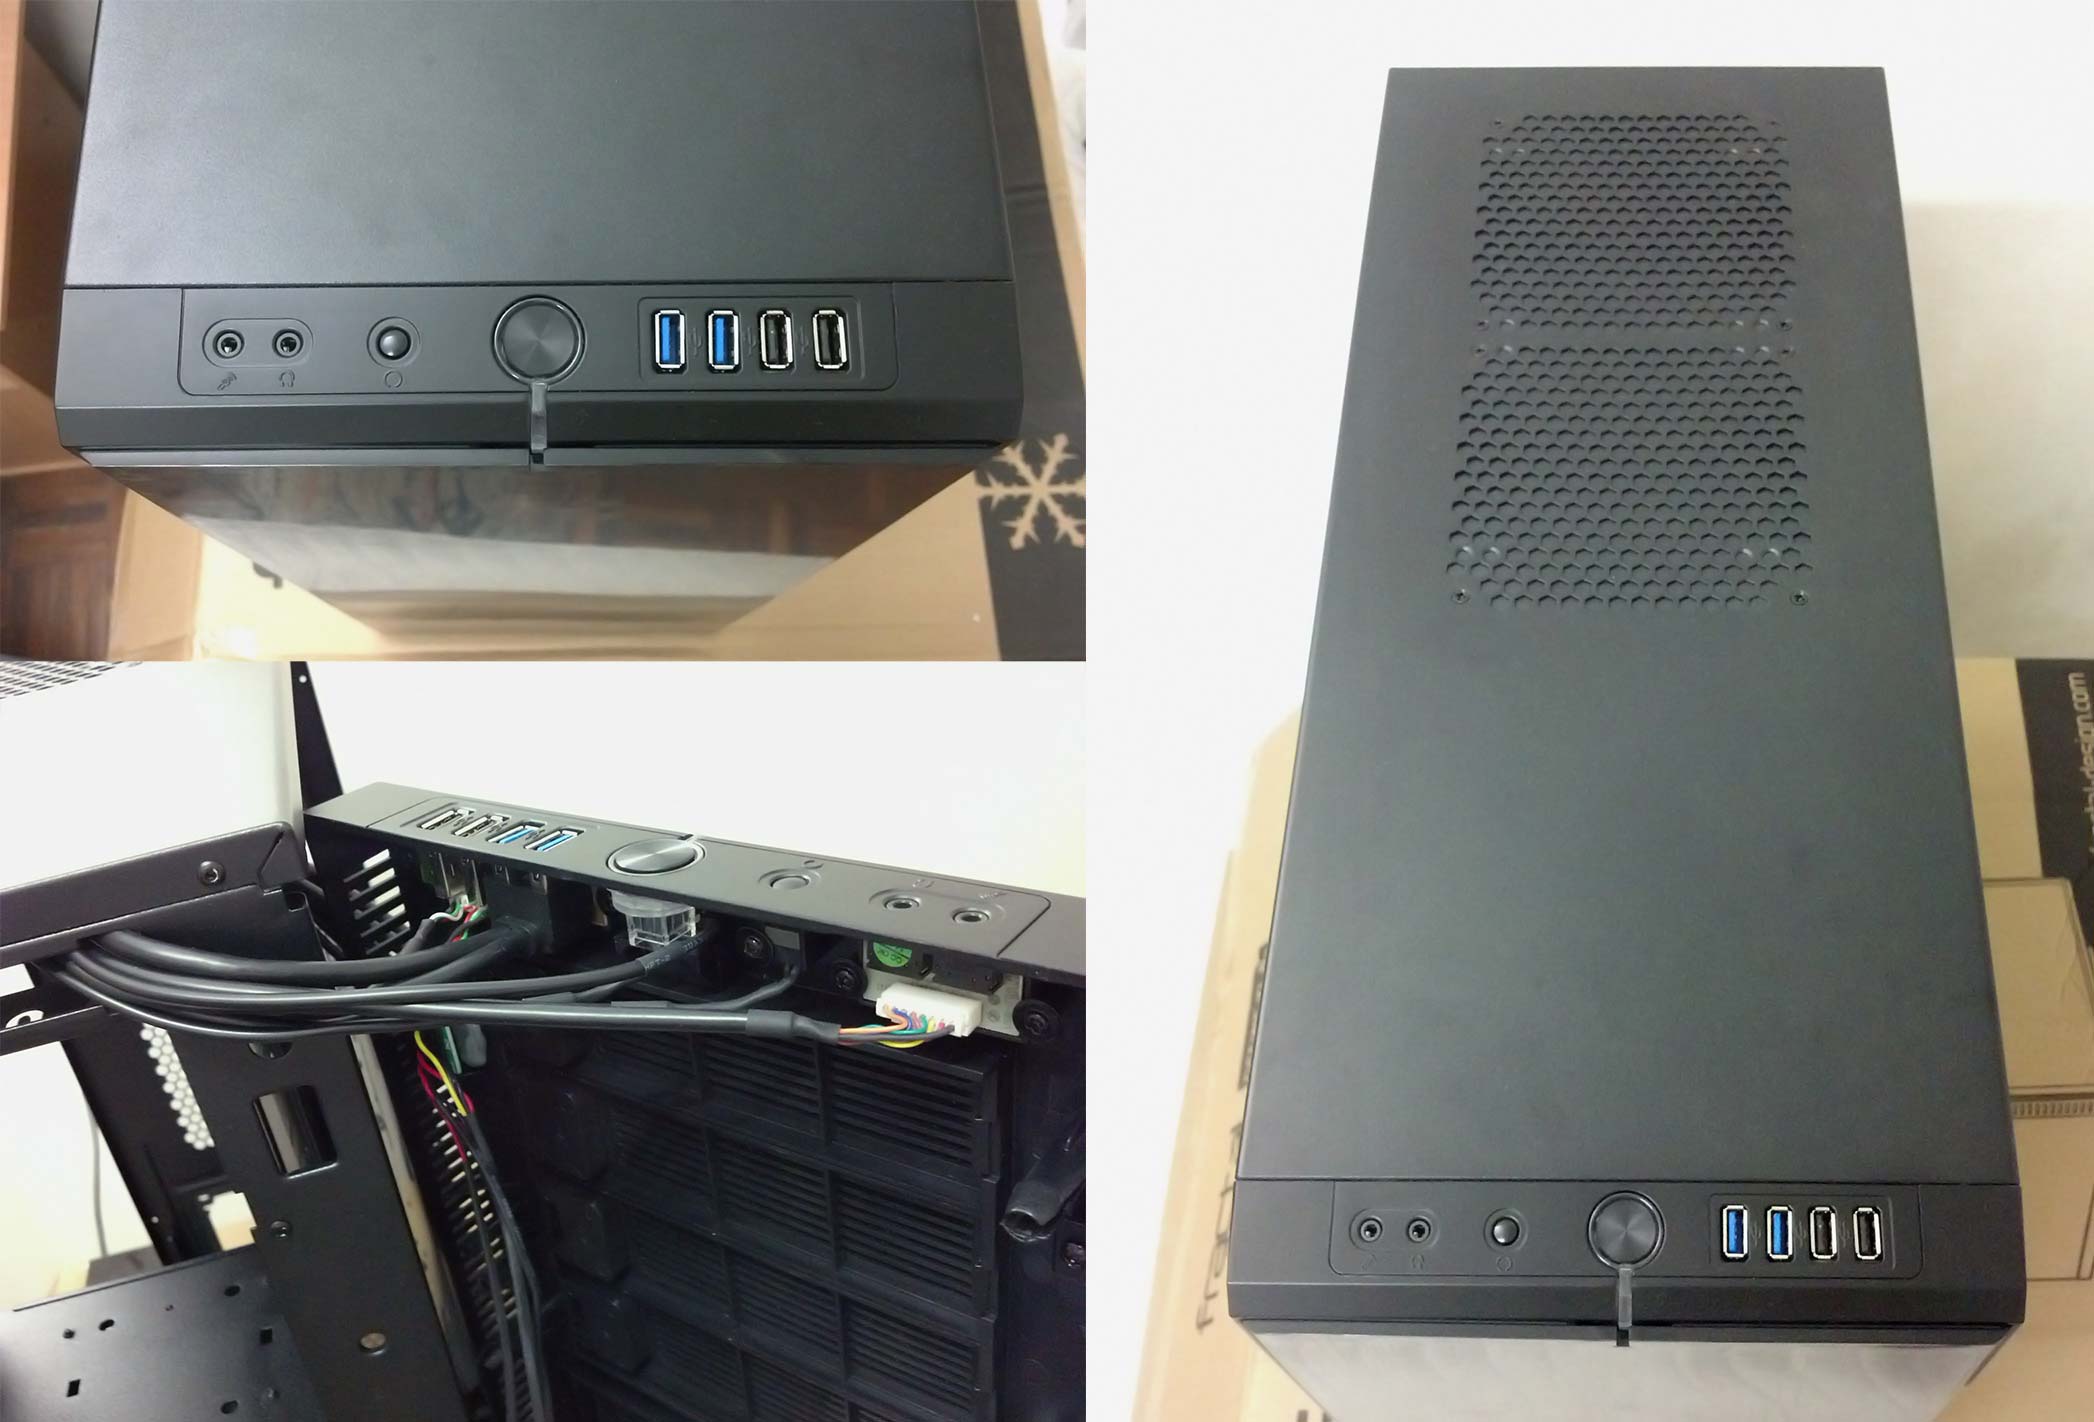
The front I/O (Input Output Ports) is located at the top. Starting from left to right, we have microphone jack, audio jack, reset switch (8mm diameter), power switch (20mm diameter), 2 x USB 3.0 ports and 2 USB 2.0 ports. I really like this design as it feels stylish and sophisticated compared to the other chassis series. The front I/O is built on the removable front panel instead on the main chassis. Therefore, do take note not to yank out the removable front panel as it will pull along the I/O cables. Disconnect I/O cables from motherboard first should you wish to remove front panel entirely. This issue does not matter much if you are not planning on removing the front panel often.
There are 2 fan slots at the top which is compatible with both 120mm and 140mm fans. For optimal silence, its recommended to have the ModuVent plates installed. Otherwise, replace them with fans exhausting hot air if you decide to switch to optimal cooling. I like this innovative design as most chassis out there that offers these fan mounting area but does not have anything covering it such as filter to prevent dust from entering.
Front Panel + Front Door
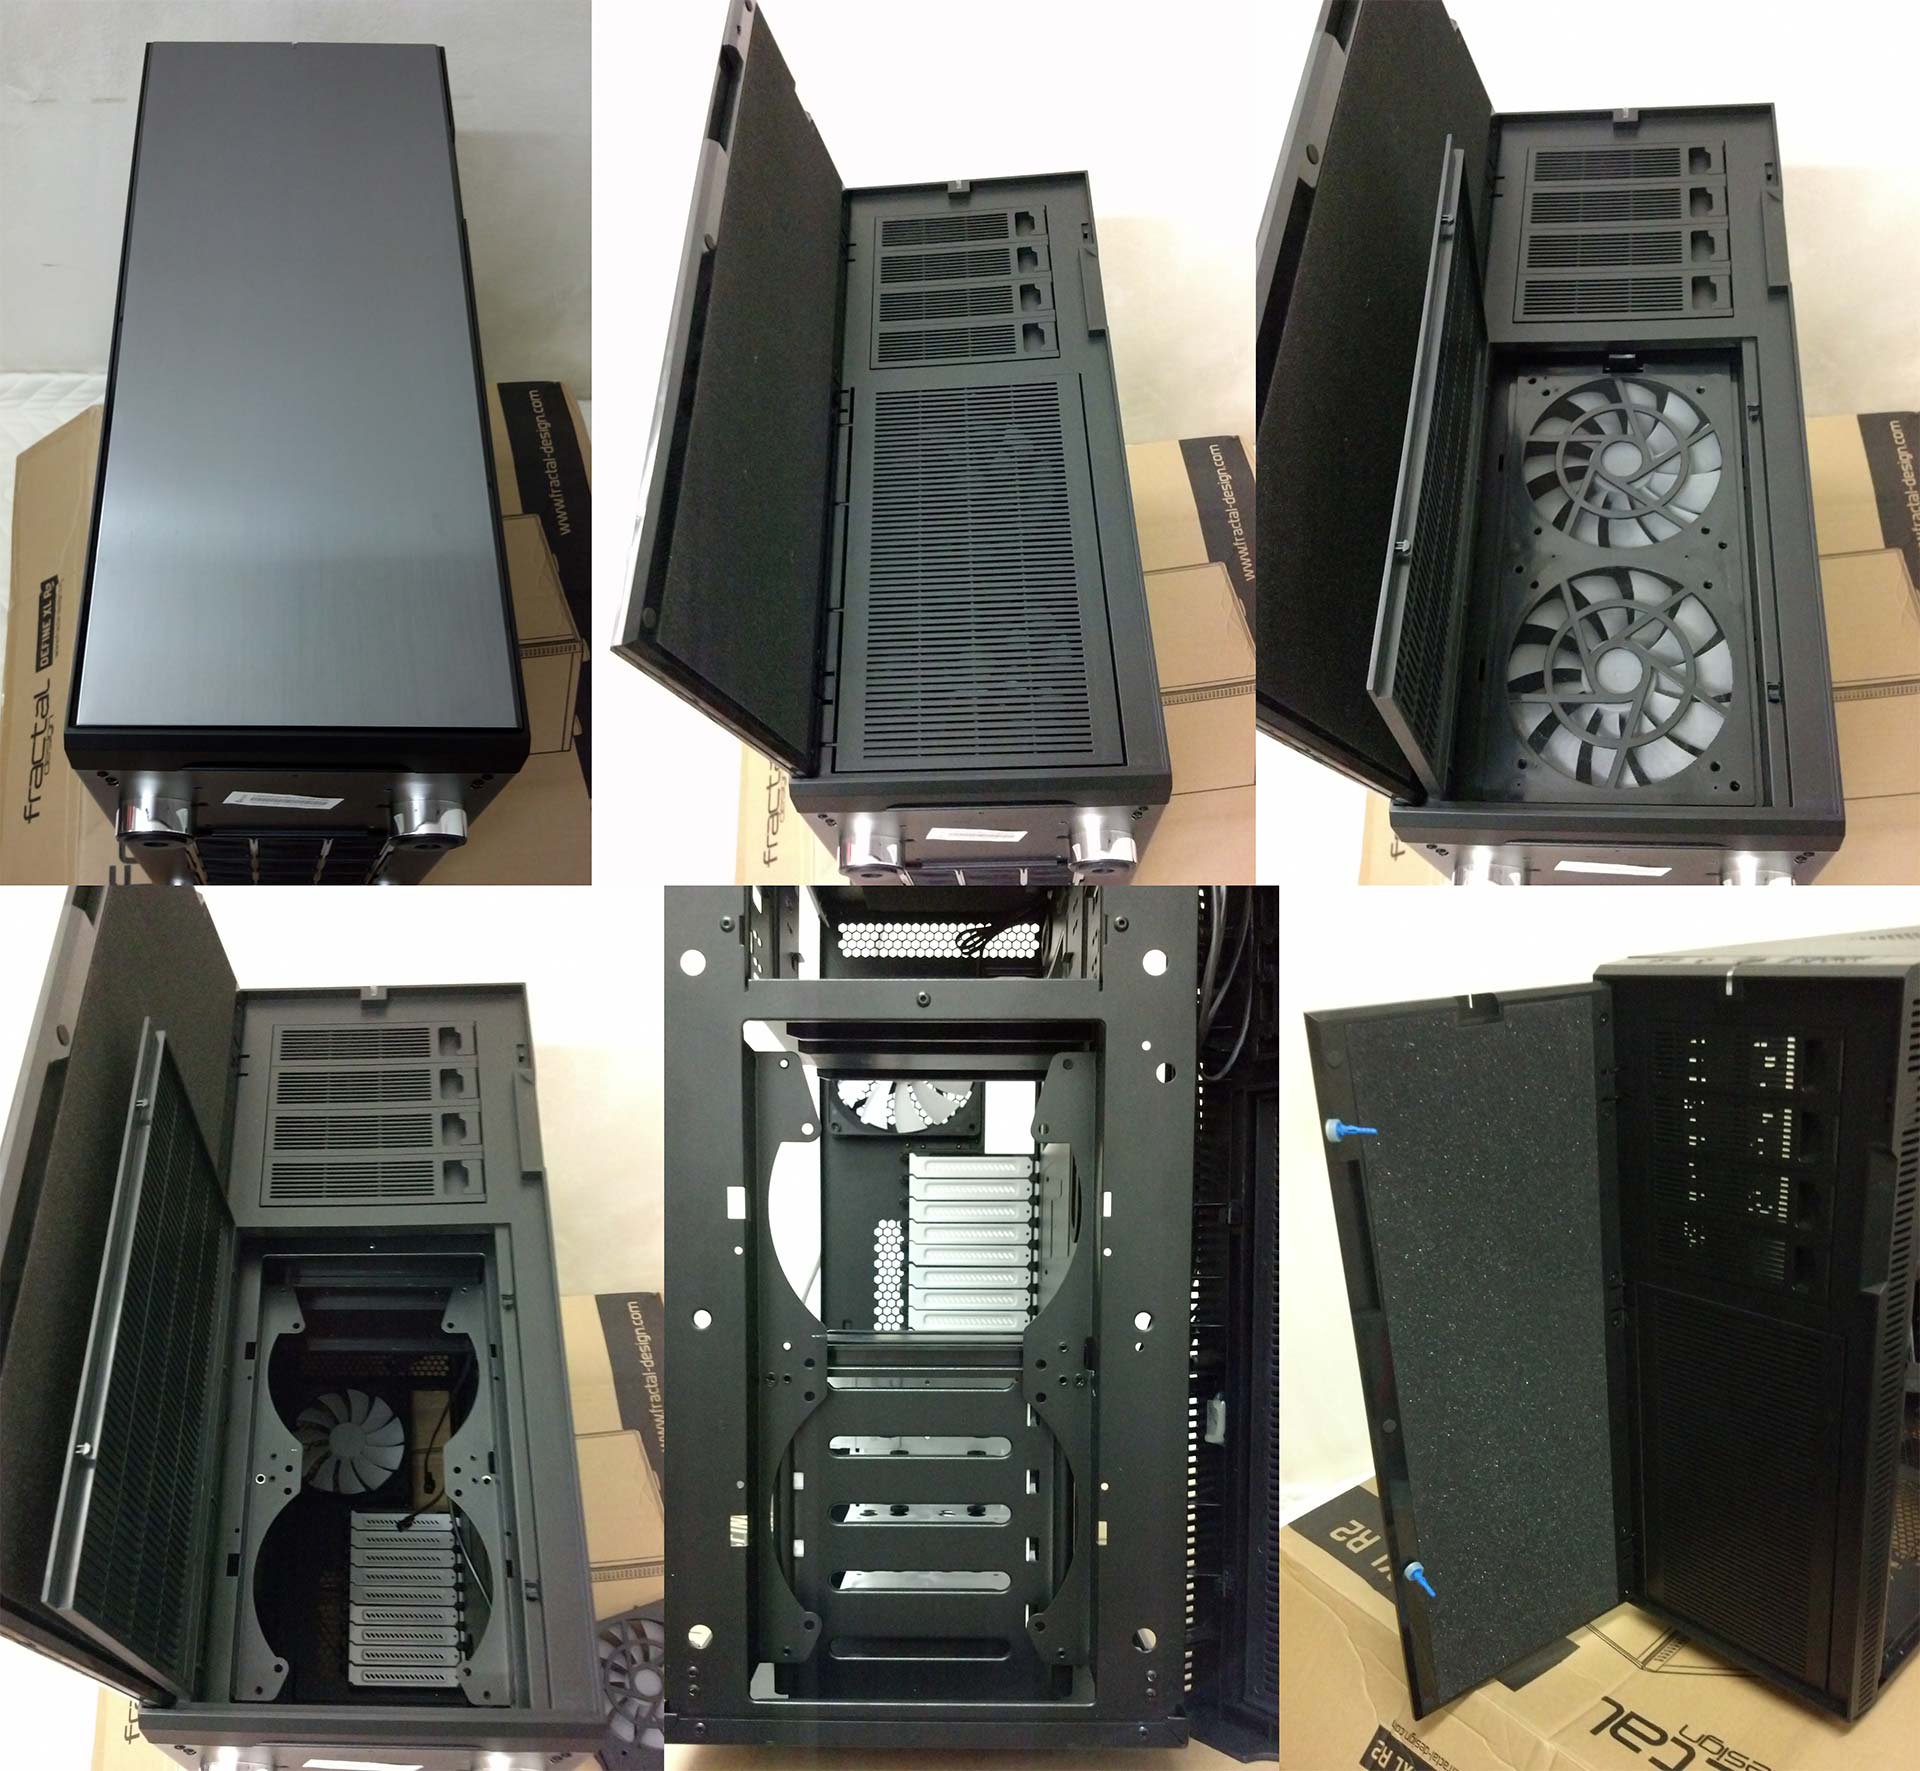
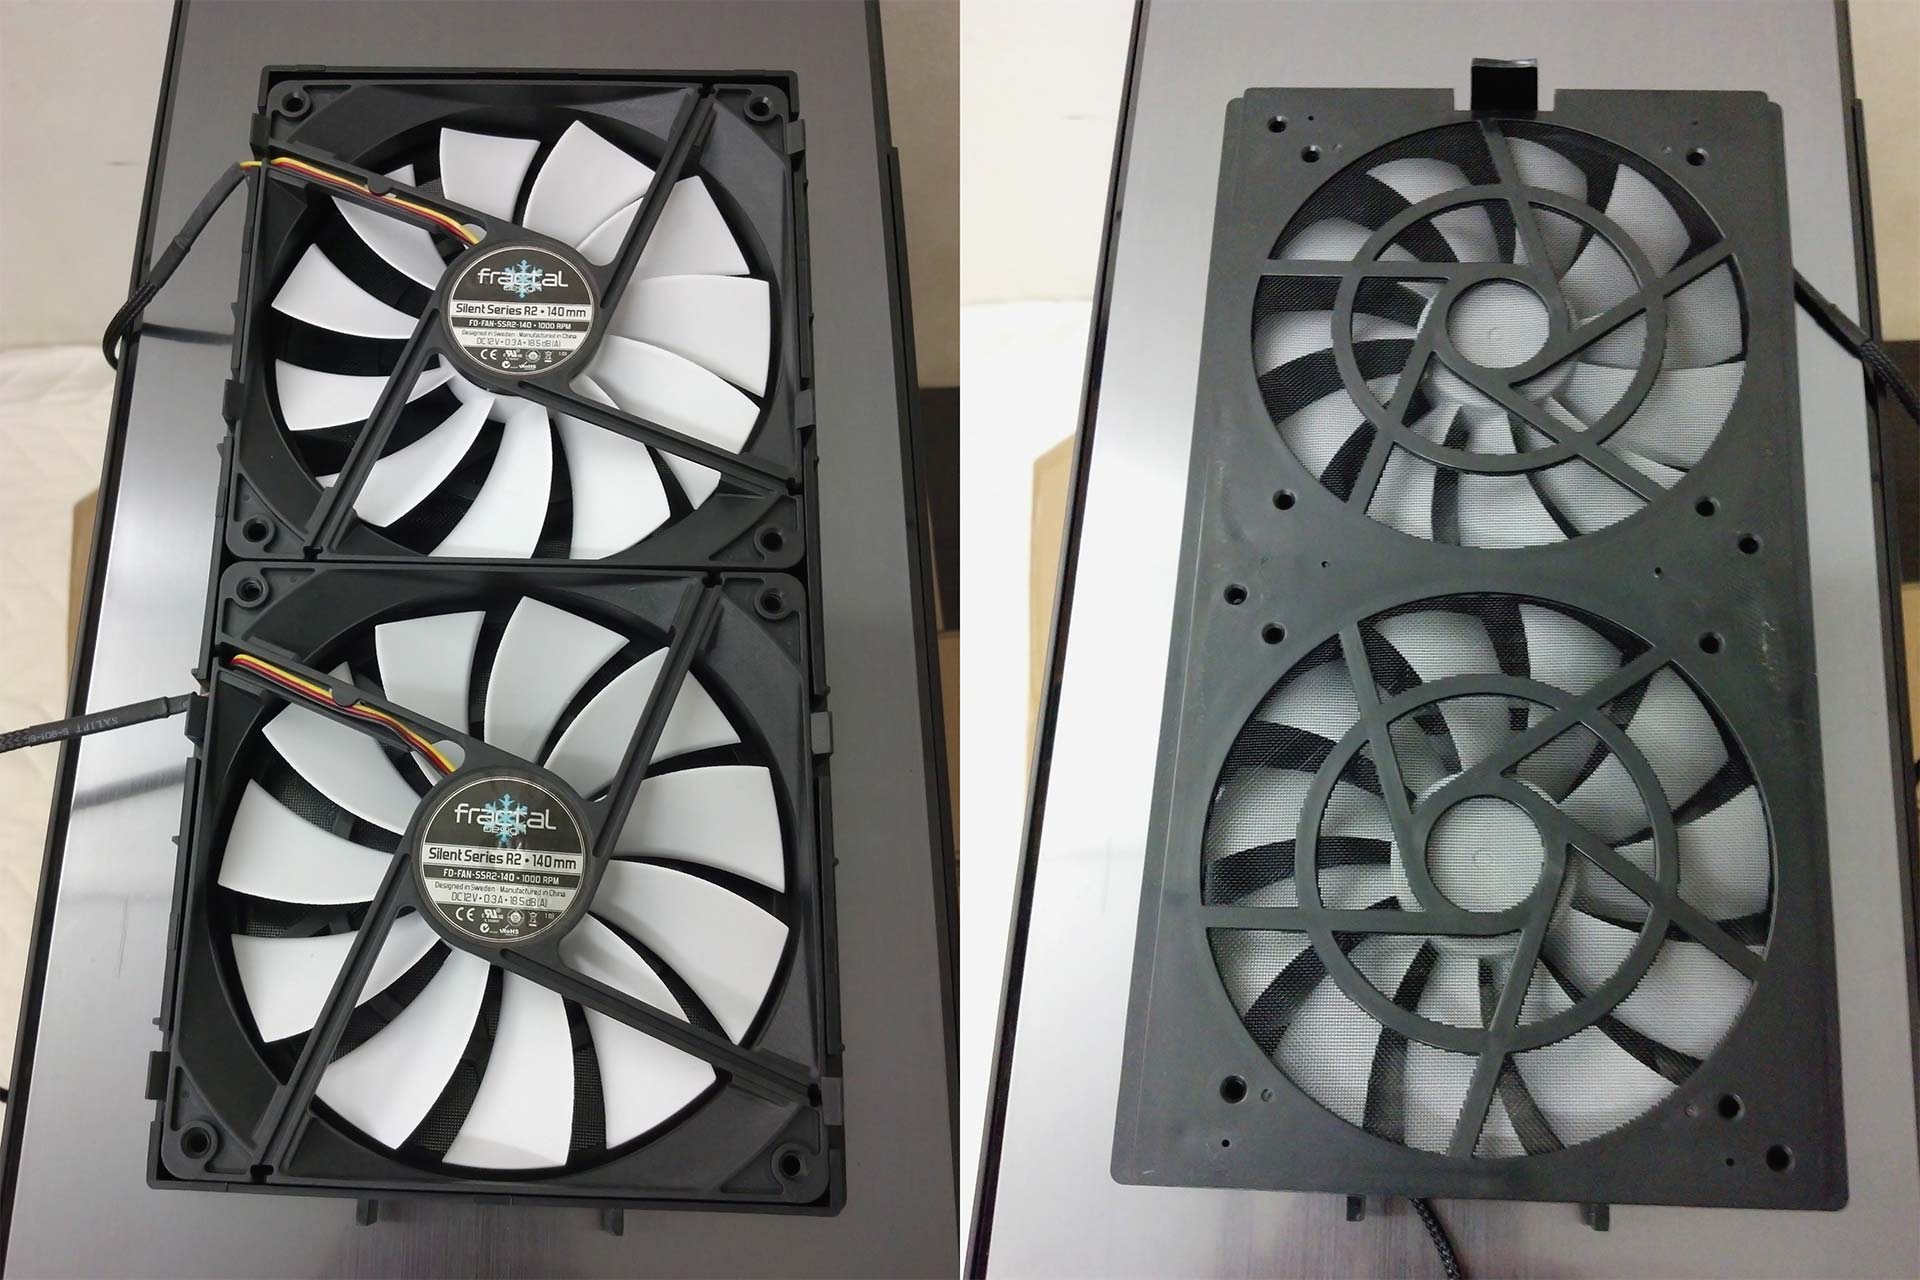
The exterior front door panel has a brush-aluminium reflective appearance without the wood-grain feel. On the sides and bottom of the front panel has ventilation holes for the front fan air intake. Opening the magnetic door reveals four 5.25 external drive bays, a removable fan slot noise dampening foam-type material installed in the inside of the door panel, a fan controller which you can adjust the fan voltage (5v, 7v and 12v), a tool-less front fan holder that holds either 2 units of 120mm fans or 2 units of 140mm fans. The door does not open more than 90 degrees and isn’t switchable as in switching it from left-hinge to right-hinge.
Based on my experience with handling various chassis, the front panel is usually removed to install/uninstall the front fans. Fractal Design solves this issue by implementing a tool-less front fan holder that makes switching front fans a breeze. Not only that, the ingenious fan holder also includes a dust filter that catches the dust before it enters into the chassis. The dust filter is attached to the fan holder, as a result, you will need to remove all the fans before you can clean them under running water or vacuum or blowing it with an air compressor. A better approach would be implementing the a removable dust filter as seen in Define R4. The ventilated door could follow the same design as Define R4 by tilting it downwards to open as it avoids issue of it auto-closing.
There were some difficulty handling the front fan cables since it needs to be tucked in tightly else it will obstruct the path of inserting the tool-less fan holder. Also, the fan holder grip is a little bit off. It’s easy to install the default Fractal Design Silent Series R2 Fans but for 3rd party fans would not be exactly a tight fit. I wished it were slightly larger but smaller than the fan grip found in Fractal Arc Midi R1. Another point I would like to touch on is there very little cutout space on the sides of the fan holder which makes it difficult to align 3rd party fan cables.
The Fractal Define Define Series front panel uses a door with noise dampening material attached. This means if you would like to install components in the 5.25 inch drive bays, you will need to avoid components with bulging screws such as the one found in water radiator and 3rd party fan controller that uses knobs or sliders as it obstructs the door from closing tightly. A touch-screen fan controller easily bypasses this issue with door-type chassis. Fractal Design could consider of having some extra room behind the front-panel door to rectify this issue.
Rear
The rear displays 9 expansion slots, 1 fan slot which can mount a 120 or 140mm fan and some honeycomb mesh at the top and beside the expansion slots. The honeycomb mesh would allow hot air to escape easily and this prevents hot air pockets inside the chassis. The 9 expansion slots are held by thumbscrews, making it easy to remove and install them. Some of the screws have to use a screwdriver as some of them are overly tightened with a power screwdriver from factory.

Side Panel
Both side panels are opened in wing-designed as oppose to sliding them on the side of the chassis for a tight fit. This design makes it easy to secure the panels onto the chassis. Do take note that these panels are very heavy (more than 2kg each). Therefore, before removing the panels off, use 1 hand to hold the bottom of the side panel while the other hand is used to open it. If this is not done, the panel would just plop downwards scratching the protective paint off the chassis.
The right side panel is plain and simple whereas the left side panel has an option to mount a 120/140mm fan. By default, its covered with a ModuVent plate which can be removed with screwdriver. It’s recommended to keep them on for optimal silence, but you can remove them to fit in a fan as intake to blow cool air towards the graphic card. However, you will need to consider to purchase a 3rd party fan filter to capture dust from entering. If a fan is installed on the side panel, large CPU tower cooler will be obstructed. The ModuVent width x height x depth is 140x140x12mm. Therefore, fitting a slim 140x140x12mm fan or using a shorter CPU tower cooler resolves this clearance issue. Both side panels are padded with noise-dampening material made of bitumen. This padding along with the heavy-thick steel plating helps absorb most of the noise emitted from fans and coil whines. Having said that, this made the chassis overall very heavy and making it a hassle to bring it around unless its a short distance or there is a trolley to move it.

Bottom
The bottom side of Define XL R2 is fitted with 4 chromed feet with rubber padding, but it does not look uniform as the front feet is larger than the rear. This approach is to support heavier load at the front as its fitted with hard drive cages and 5.25 drive bays. There are some times where sliding the chassis on the desk to make room had somehow broken the contact of the sticky glue holding the chrome feet to the padded rubber. This can be easily fixed by applying super glue from user point of view. This issue could be circumvented by smart designed if the screw were to be threaded into the rubber padding to the chrome feet for a better secure fit.
There is a rather long dust filter that covers both the power supply intake as well as a 120/140mm fan slot. The dust filter width and height is approximately 355x145mm. This lengthy dust filter makes it very difficult to be removed and inserted back as you will need ample room behind the chassis to perform this feat. It would be more convenient to have it inserted and removed from the front. Some reputable chassis taken care of this issue by implementing 2 independent dust filters, a short dust filter for the power supply which is removed from the rear whereas a longer dust filter for the bottom fan mounts which is removed from the front or sideways.
Fractal Design Define XL R2 Interior
Motherboard
The motherboard tray does not have any pre-installed motherboard standoffs. Most reputable manufacturer selling premium chassis have these installed to ease the installation process for user. Fret not, Fractal Design do provide a motherboard standoff fastening tool to aid you in installing them which is packed along with the accessories. Therefore, you can install the required amount of standoff depending on the type of motherboard you have.
The motherboard cutout has a width and height of 150x145mm. This cutout is implemented to allow 3rd party CPU cooler mounting bracket installation. The motherboard tray lacks of mounting holes near to the rear which is very useful for hanging unused non-modular cables behind that area. Non-modular power supply owners have the option to tie these unused cables and placed it in the front of the motherboard tray for convenience but the unsightly rat nest of power cords does not look pleasant for windowed-panel chassis. Two SSD can be mounted behind the motherboard tray with screws but it requires a full dissemble of the motherboard, which isn’t convenient compared to other chassis in the market that implements SSD brackets to fit in the SSD, and the bracket is hooked to the motherboard tray without using any screws. Fractal Design could consider incorporating SSD bracket as seen implemented for Fractal Arc Mini R2.

The Define XL R2 can fit both small and large motherboards ranging from mini-ITX to XL-ATX. As a note for those XL-ATX and E-ATX motherboard owners, the E-ATX motherboard will obstruct the rubber grommets on the right-side. This means they would need to route the 24-pin power connector cable for motherboard without using the rubber grommet placement. This same applies for XL-ATX motherboard owners as the larger size obstructs the rubber grommet located between the power supply and motherboard, which makes it difficult to plug in those power switch cable, reset switch cable, HD audio cable and so forth.
For mITX, mATX and ATX owners, there will not be any clearance issues with any of the rubber grommets. It seems that the motherboard tray is missing a cable hole just below the ATX power switch and reset switch connection. Hence, users will need to route the cables from the main vertical holes of the motherboard tray.
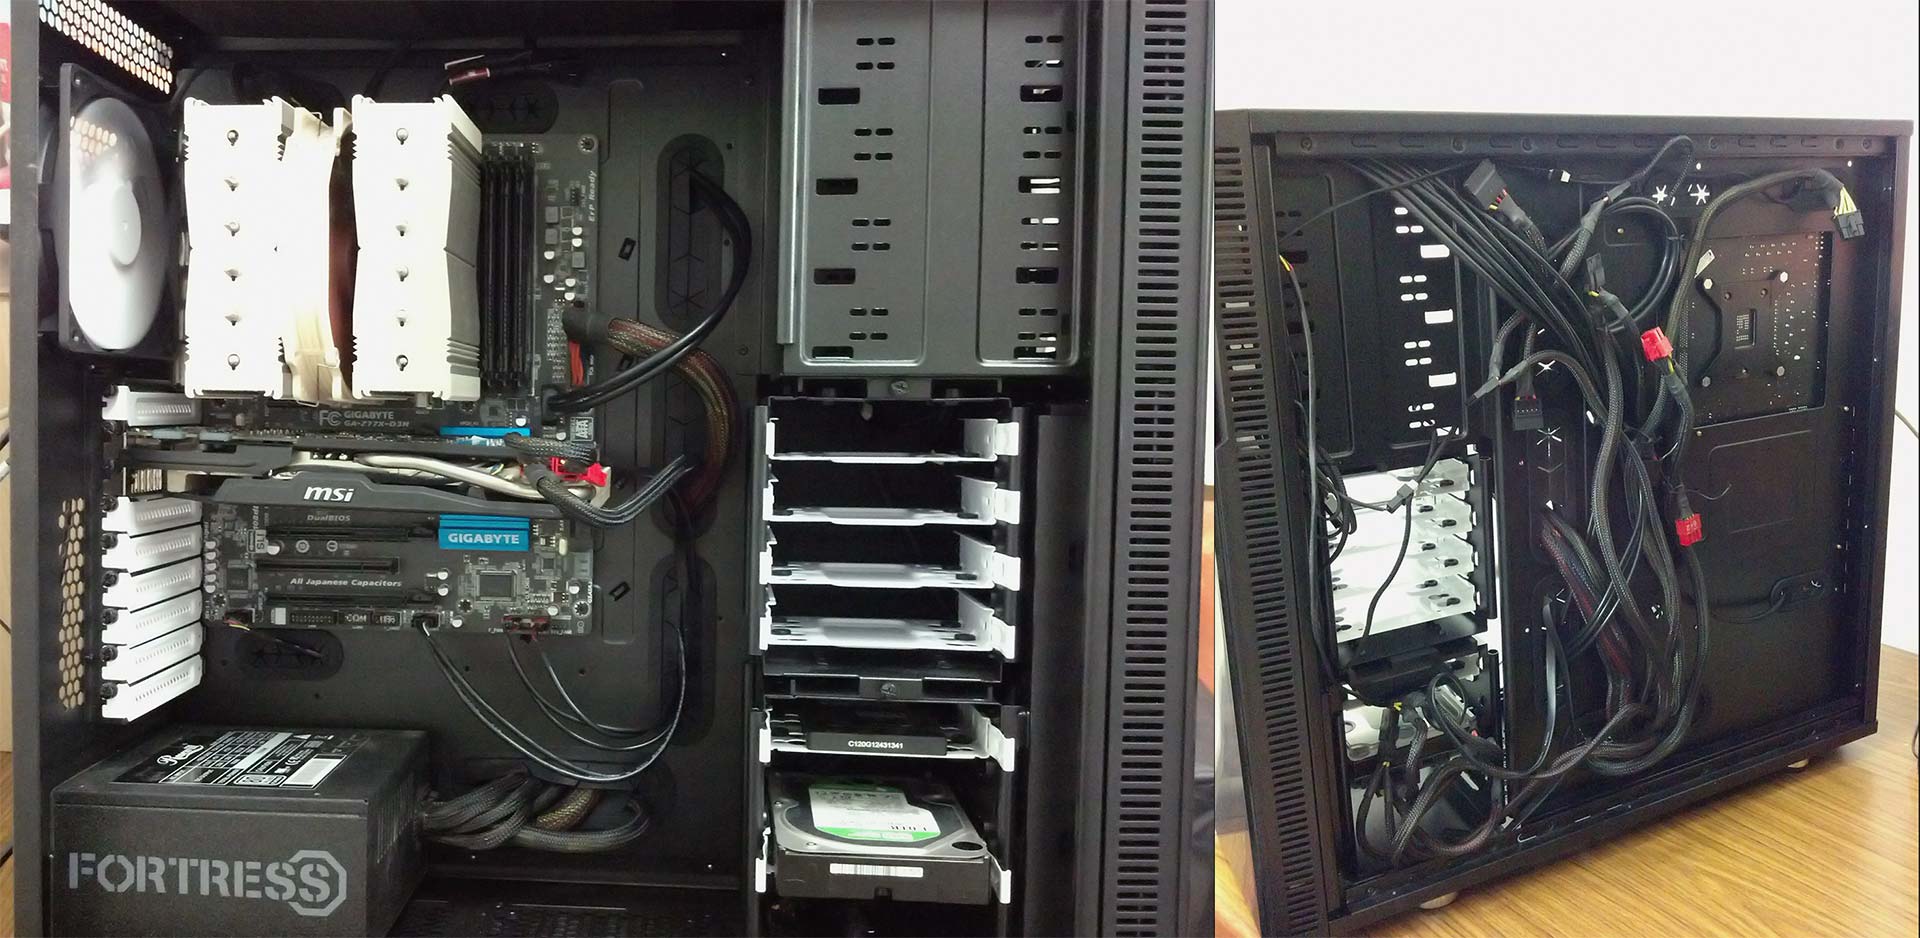
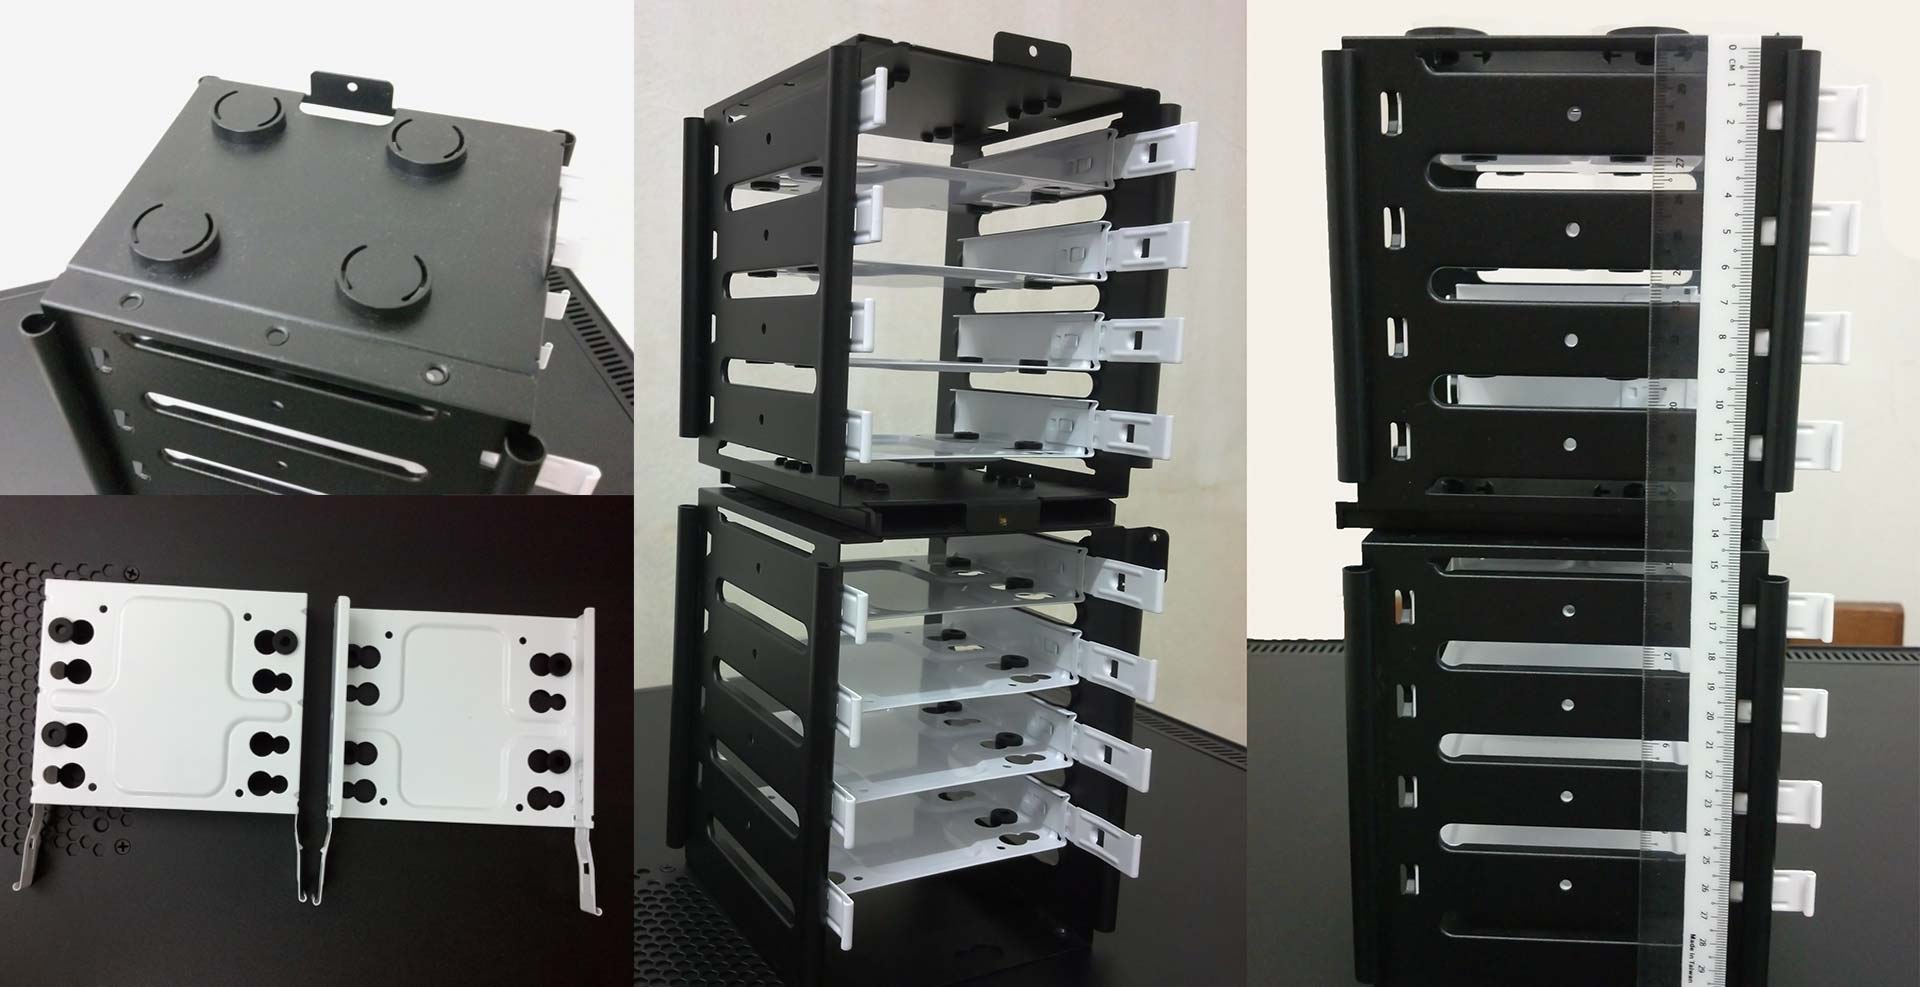
SSD/HDD Storage
Fractal Design Define XL R2 offers 2 HDD cage, each harboring 4 drive caddies. This provide ample room for RAID purpose from 2 up to 8 Hard Disk Drive or Solid State Drive. The drive caddies are made of steel so you do not need to flex it at all so it feels very sturdy and doesn’t break. To install either SSD or HDD, you will need to use the supplied screws to secure them on the drive caddy. Do ensure you are using the right screws else it may risk of scratching the drive above/below it.
Currently, few manufacturing chassis companies have migrated to tool-less HDD drive caddy design and this requires either flexing/expanding the plastic-type drive caddy to secure the HDD. There are pros and cons with this design since it can break if not handled correctly. Fractal Design opt for a simpler screw-secure approach which avoids these issues, so users just needs to have screwdriver at hand.
Both drive cages are removable should you wish to install a large thick radiator (dual 120/140mm fan with 60mm radiator depth) in front along with the water reservoir, but this means trading off those storage area. You can use double-sided tape to mount SSD onto the side wall of the 5.25 inch drive bays or behind the motherboard tray. You can install push/pull water radiator by removing the top HDD cage and migrating the bottom HDD cage further back to the power supply, but doing this will require you to remove the bottom mounted fan.
By default, all of the HDD cages are placed to optimized clean build and tidy cable management, where the HDD/SSD cable mounting is facing the rear. When I was installing a non-flat SATA cable, I had issues with closing the right side panel, but this does not occur to me when I was building in a Fractal Arc Midi. Out of my curiosity, I decided to measure both of these HDD cage rear clearance and discovered that the Fractal Arc Midi R1 has an additional 10mm clearance compared to Fractal Define XL R2. For users who owns a power supply that comes with flat power cables or uses custom flat sleeved/braided power cables, they will have sufficient space to route the cables without any hassle of closing the side panel.
Power Supply
Define XL R2 provides sufficient room to cater super large power supply up to 200mm in length before it touches the bottom fan. The power supply is supported by 2 rubber pillar instead of 4 rubber pillar as seen from other Fractal Design Series Chassis such as the Arc, Node and Core. This makes it difficult to have it sitting upright while securing the power supply with screws. Also, these 2 tall rubber pyramid-like pillars are glued to the bottom of the chassis, and mine came out due to the glue wearing off. The power supply support issues can be avoided if they implement the same design from their other chassis series and add a thicker round rubber padding onto the raised metallic power supply standoff to compensate the height.
5.25 inch drive bays
The Define XL R2 has four 5.25 inch drive bays which are non-tool-less. You will need to use the supplied screws in the accessory box to secure your ODD (Optical Disk Drives) or fan controller or etc. Most chassis companies are moving towards using tooless design to ease users installation.
Fractal Design Define XL R2 Clearance
Graphic Card Clearance
340mm (with top HDD cage) / 470mm (without top HDD cage)
Power Supply Clearance
200mm with bottom fan. Capable of hosting long power supply such as Corsair AX1200.
CPU Air Cooler Clearance
170mm height (for CPU tower cooler) + 10mm height (for CPU mounting bracket). Capable of hosting tall CPU tower cooler such as Noctua NH-D15 and Phanteks PH-TC14PE CPU Cooler.
Top Water Radiator Clearance
80mm depth from top panel to memory slot. Suitable for 30mm radiator with either push/pull with regular fans with depth of 25mm. As a safe parameter, 68mm clearance for the top fans. Will not be possible with push and pull configuration as it will somehow obstruct the 8-pin power connector for the motherboard and causes some memory clearance issues. Fits 240mm and 280mm water radiator in the top chassis.
Front Water Radiator Clearance
310mm height from bottom to external 5.25 inch bay. 45mm clearance for water cooling push/pull configuration upon relocating the bottom HDD cage closer to the power supply. Recommended to have fans installed at the front while the radiator is installed within the chassis. Push and pull configuration is possible but requires to remove both HDD cages.
Bottom Water Radiator Clearance
Not possible with dual 120/140mm water radiator as it only has 1 slot of 120/140mm fan mount.
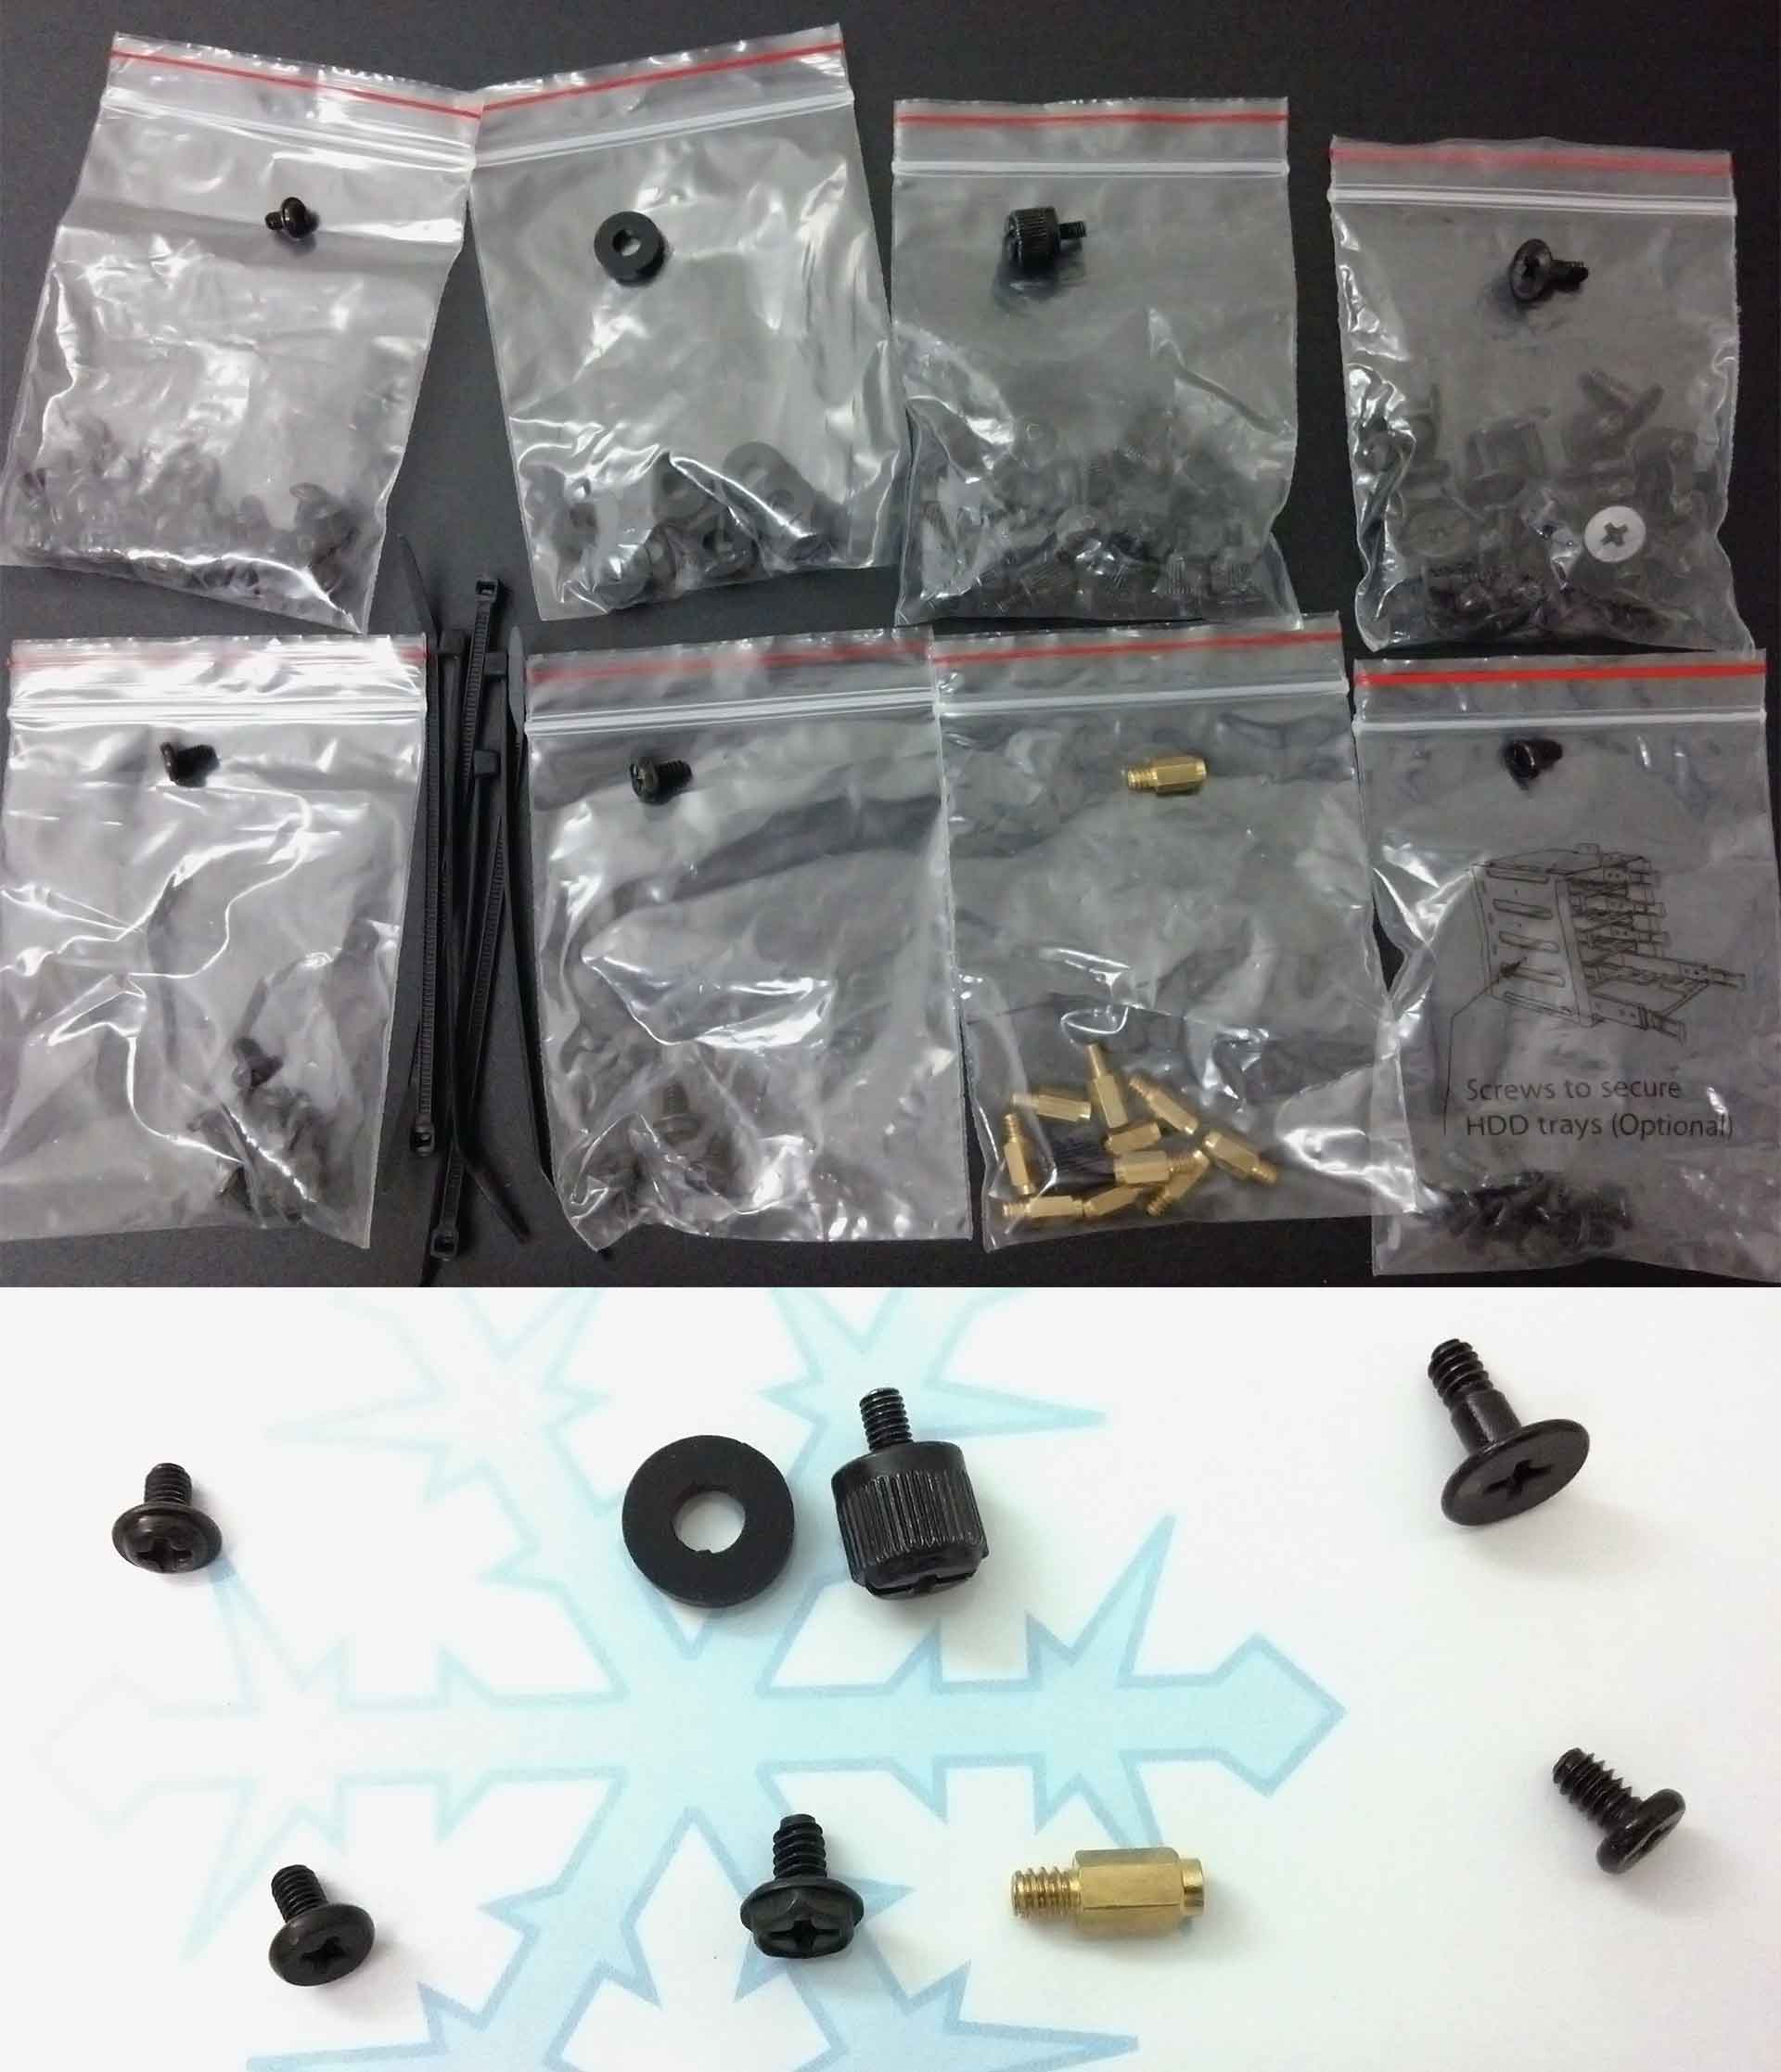
Fractal Design Define XL R2 Accessories and User Manual
The accessories are nicely packed within a black box which has some labels of each screws and the total units of it. The user manual comes separately in a sealed plastic bag with a red paper note describing steps for user to take in the event of receiving a faulty product. The accessories are 4 x PSU screw, 11 x motherboard standoffs, 32 x SSD screw (Solid State Drive), 11 x motherboard screw, 16 x thumbscrew for ODD (Optical Disk Drive), 8 x HDD tray screw (Hard Disk Drive), 12 x Rubber Spacers, 1 x motherboard stand off fastening tool, 32 x anti-vibration HDD screw and 6 x cable ties. I discovered the thumbscrews that comes inside the accessory box is not the same ones as the side panel, expansion slot and HDD cage. However, they still can be used to secure either these 3 items should you lose the original thumbscrews, but this also means less screws to secure the optical disk drives. The rubber spacers are supplied to be used with installing additional fans in the top and side panel positions. It’s purpose is to avoid direct contact between the chassis and fan, thereby minimizing any noise as a result from vibrations.
The user manual contains several language support namely English, German, Spanish, Italian, Chinese, Japanese, Korean, Polish, Russian, French and last but not least Swedish. As the chassis is build with Scandinavian design and quality, it would be kinda awkward of not having it in. The manual also includes an overall exploded view of the chassis, water cooling options advises, tips on installing additional fans with provided rubber spacers, tips on managing the adaptable hard drive cages, fan controller, front fan filter maintenance and power/HDD LED activity. However, it does not include any notes on how to install these motherboard standoff. It would be very valuable for first-time builders on the placement of this motherboard standoffs and also helpful if the accessory are labeled in multi-language as the black accessory box labels accessory in English.

Fractal Design Define XL R2 Final Thoughts and Conclusion
Fractal Design Define XL R2 really impresses me with its noise reduction solution. When turning on the PC or leaving it on idle, I could not really tell whether its running unless I see some messages displayed on my computer monitor booting from the BIOS to the Windows OS desktop. The 3 included Fractal Design Silent Series R2 fans are absolutely quiet even though they are all powered at 12 volts via the fan controller. The noise from these fans are easily overwhelmed by external noise such as computer speakers, headset, 12 inch portable room fan or ceiling fan. During my tests where I ramp up the CPU cooler fan (Noctua NH-D15 equipped with NF-A15 PWM fans) up to 14000-1500 RPM, I noticed considerable low humming noise emitted from the Define XL R2 as it’s placed on top of my desk, 80 cm away from where I sit. Since the rear of Define XL R2 is mostly ventilated, noise easily escaped without being absorbed by the noise-dampening material, and this leaked noise is reflected from the wall and scattered around the room. If it were to be placed on the floor below the desk or within a semi-enclosure, the noise would be less obvious. For those silent rig builders who want the best ultimate silent chassis, do consider this chassis. Combining this chassis with passive CPU tower cooler, fanless power supply and chassis fan equipped with rubber spacers and running below 1200 RPM makes it an incredible silent computer case.
Looking at the temperature aspects, its 4-6 degree Celsius hotter compared to the Arc Series with all 3 ModuVents installed and upon removing these, the temperature drops by 1-2 degree Celsius. As for benchmark purposes, with ambient temperature of 29 degree Celsius and performing AiDA Stability Test (CPU + FPU) with an Ivy Bridge i7 3770K at 4.4 Ghz racks up temperature up to 70-74 degree Celsius on Arc Midi R1, whereas on the Define XL R2, it would reach approximately 75-79 degree Celsius maxed with ModuVents and default Fractal Design Silent R2 fans running at 12 volts.
Fractal Design could consider selling ModuVent plates as part of computer case accessories so it can be used as a cover for their other chassis lineup such as Fractal Design Core Series to prevent dust from entering. I would like to see Fractal Design adding extra fan mount on the top to support a triple 120mm or 140mm fan (360-420mm radiator compatibility) and extra fan mount at the bottom to support dual 120mm or 140mm fan (240-280mm radiator compatibility) to increase the potential for water cooling support. This would appeal to a wider audience especially the water cooling enthusiast. The top fan mounts may need to be offset closer to the left-side panel to provide sufficient clearance away from motherboard but it would not look pleasant. This unbalance appearance can easily be solved by having a removable top panel cover as implemented in Arc Series. If Fractal Design opt for this route, they can further improve the cover by having a removable dust filter implemented similar to the front fan holder of Define R4 instead of using the foam-type filter that is difficult to wash or clean with a vacuum/air-compressor. Another interesting idea that Fractal Design could contemplate is having the modular drive cages as part of their accessories and modify the DefineXL R2 to have sufficient room to host 4 drive cages. This opens up an opportunity to attract users who wants to create a large silent NAS Server with 16 HDD/SSD.
If Fractal Design ever do make a Fractal Define XL R3, hopefully they will incorporate the fixes to the issues pointed above to achieve a more user-friendly, hassle-free and greater flexibility and space efficient case while providing excellent noise-reduction. The Fractal Design Define XL R2 Titanium Grey gets my recommended award and I hope you like my review on the Fractal Design chassis. Don’t forget to leave a comment if you have questions/feedback about this chassis and thanks for reading!
Special thanks to Lihan Wang for making this review possible. For more details on Fractal Design Define XL R2 or Define Series Chassis or other any of their products, you can visit their official site at www.fractal-design.com
Of course, there are other “fun” luxury cars on the market, and although vehicles such as the Acura TL could definitely give the Maxima a run for it’s money, the Maxima offers more standard features, a lower price tag, and more overall space, not to mention a smoother ride. Datsun Infiniti (department) President Cost Production Line UD Car Diesel Powered VVL VVEL d – Ci. Cooler sites mean lower gas expense and better performance.
How can I inform him?